
Basic Training Agenda
In this training, you will create and edit several Paragraph Types and Content Types on an existing Site Page in the Editor user role. We will then take a short break while the instructor increases your user role to Publisher. You will publish content, then see how that content appears in different default Views. Training will conclude with an independent exercise. You may continue practicing on this site for one week after training. If you have questions during that week, please email the instructor.

1. Add Paragraph Types to Page Content
- This is a Site Page. It contains one invisible band or column. All Page Content is stacked within this band.
- Landing Pages may contain multiple columns, so Web Managers must insert a band with the desired number of columns before Page Content can be added.
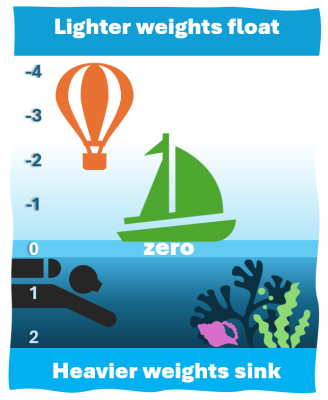
- New content is added to the bottom of the stack. Content can be rearranged vertically with row weights or by drag-and-drop. Lighter weights float, and heavier weights sink to the bottom.
Edit Text: Create an Anchor for a Jump Link #AnchorSix
Add CTA Card to Page Content National Weather Service in Newport/Morehead City.
Add Video Card to Page Content https://youtu.be/PTWkVplN5t0?feature=shared
2. Edit Tab/Accordion Items
- Add a new tab for a new animal. Put the animal's name in the tab and text area.
- In a new browser window, search for the animal and copy an image of it.
- Paste the image in the text area. Ensure that the Text format below the text area is set to "Paste Filtered HTML."
- Save the page.
- Reopen the paragraph type and change it from the Tab display to the Accordion display.
Animals
Alpaca

Black Bear
Cheetah

Editors Can Create a:
Create a Blog Entry
Let's create a Blog Entry together. When we discuss views, you will see how your Blog Entry is dynamically displayed in different default views.
- Content > Add Content > Blog Entry
- Optional: Open detailed step-by-step instructions in a new window.
- Editors "Save for Review" by a Publisher.
Create a Press Release
Let's create a Press Release together. When we discuss views, you will see how your Press Release is dynamically displayed in a default view.
- Content > Add Content > Press Release
- Optional: Open detailed step-by-step instructions in a new window.
- Editors "Save for Review" by a Publisher.
Create an Event
Let's create an Event together. When we discuss views, you will see how your Event is dynamically displayed in different default views.
- Content > Add content> Event
- Optional: Open detailed step-by-step instructions in a new window.
- This content type publishes automatically for Editors.
Create an Alert
Let's create an Alert together.
- Content > Add Content > Alert
- Show on Specific Pages > Single Page
/LASTNAME-site-page - Optional: Open detailed step-by-step instructions in a new window.
- This content type publishes automatically for Editors.
Welcome Back!
Please note the changes to the toolbar at the top of the screen. During the break, your user role was increased to the Publisher role.

4. Publish Changes as a Publisher
- Click your Username in the black tool bar. The white menu beneath it changes.
- Click Moderation Dashboard.
- Look under Needs Review and Draft Content for the Content Types that you edited.
- Another Option: Click Content in the top toolbar to see all Content Types in a searchable, filterable format.
- Click each link to go to the Content Type and Publish it.
- Blog Entry
- Press Release
- Site Page
5. Explore Views: Dynamic Presentations of Content Types
-
Blog
- The /blog page displays all Blog Entries in Grid View. This is the Landing Page link in the menu across the top of the page.
- The /blog-entry-list page displays all Blog Entries in List View.
-
Event
- The /events page displays all Events in List View. This is the Landing Page link in the menu across the top of the page.
- The /upcoming-events-page displays all Events in Grid View. This is the Site Page link named Events Grid View beneath Events in the menu across the top of the page.
- The /past-events page displays all Past Events in List View. This is the Site Page link named Past Events List beneath Events in the menu across the top of the page.
-
Press Releases
- The /news/press-releases page displays all Press Releases in List View. This is the Landing Page link in the menu across the top of the page.
6. Practice Independently with a Real-World Scenario
- Work independently to complete this task, but please feel free to ask for help when needed.
- A blank Site Page has been created for you to complete this exercise. Locate your name in the right rail menu on the exercise instructions page.
- Your training user account and pages will remain available for one week before being deleted to allow you to continue exploring on your own in a risk-free environment. If you have questions while practicing during the week after training, please email them to the instructor at jennifer.vinciguerra@nc.gov.